Recently, I decided to try setting up a test phone system (that will also be my actual apartment’s phone system) at home. This system, based on the tiny Raspberry Pi 4 computer running RasPBX (a customised version of FreePBX for the Raspberry Pi), was easily able to connect with two SIP telephones (an Aastra SIP phone and Linphone softphone) and two SIP trunks, one from a Canadian SIP provider for my Canadian number, and one from a French SIP provider for my French number.
So far, the entire setup was IP-based, but I also wanted to be able to include my telephone line provided by my internet provider. My Canadian phone number billed me by the second for every call made except to toll-free numbers, and my French SIP provider included calling to landline telephones in about 40 countries, but not to mobile phones – even in France. However, the phone line provided to me by my Internet provider provides me with free calling to landline phones in over 100 countries, plus – most importantly – cell phones in France.
This led to a situation where to call a French mobile phone without paying extra, I had to use a physical telephone connected to the telephone jack on my ISP’s gateway device (called a “box” in France – even in French), instead of just dialling the number from my SIP phone. In addition, incoming calls on this line wouldn’t go into my phone system, instead being taken over by my telephone service’s voicemail system. This left some room for improvement, so I looked for a solution, and found it: purchase an “FXO gateway”. An FXO Gateway would plug into the phone jack on my ISP’s box, and convert the analog signals into a digital SIP line to which my Raspberry Pi PBX could connect.
In some sort of sick tossup between thriftiness and ecology, instead of purchasing a simple FXO gateway that enjoyed widespread use and did exactly what I needed, such as the Linksys SPA3102, I thought “why not find a used equivalent on eBay?”. In the end, I spotted a Cisco UC320W small business phone system, over-equipped for my needs, with 4 FXO ports, 1 FXS port, audio ins and outs, and a myriad of other extra options. The price was about the same as an SPA3102, so I thought that getting the more advanced option for the same price might be a better. I checked online for reviews and support on online communities, and found… nothing. …but with a device of this calibre, surely it will at least be as good as the other, more basic device!
How wrong I was.
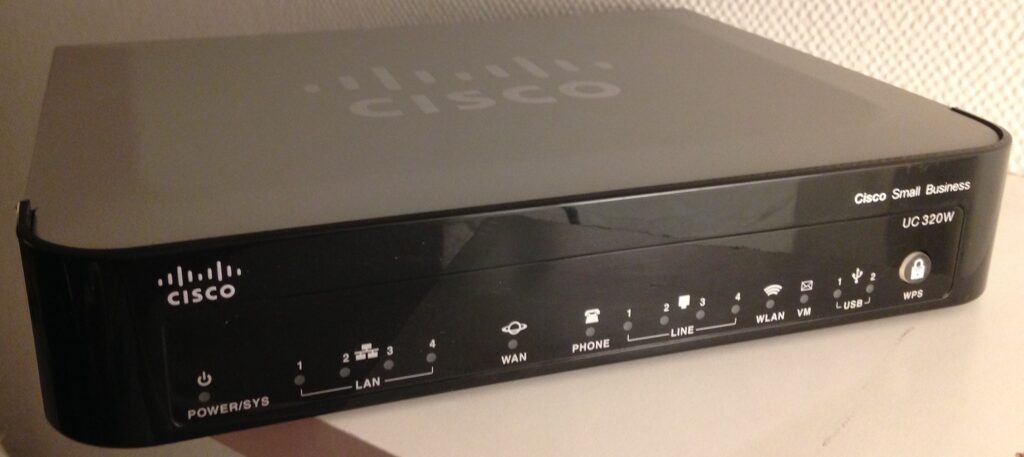
This device was designed to be the communications hubs of small-to-medium-size businesses, allowing the use of SIP phones (and traditional phones with adapters) as client devices and either SIP trunks or FXO lines as ways of connecting to the telephone network. However, I soon realised that Cisco had designed the configuration utility such a way that you could only set it up exactly the way they wanted it, which seemed to be:
– only using specific Cisco phones
– very little control over options about routing or dialling
– no use of the device as a SIP gateway 🙁
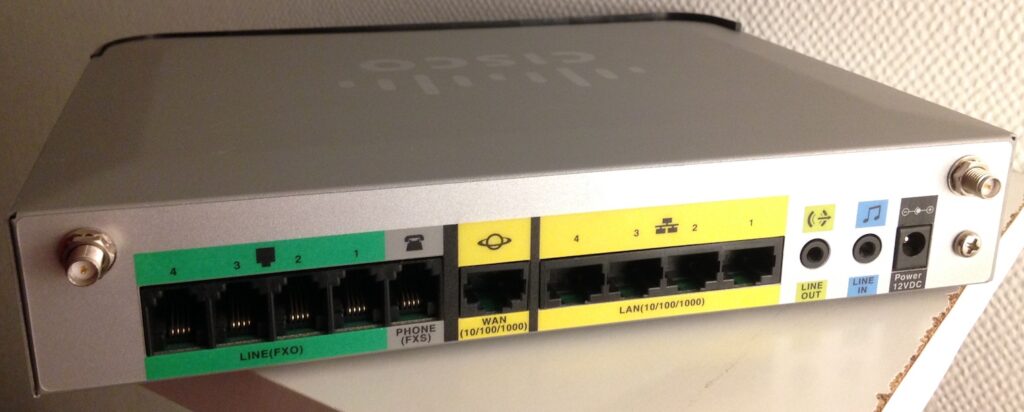
This device is designed with the following interfaces:
– WAN port: connects to the upstream device, such as a modem or a router
– 4 LAN ports with two VLANs, VLAN 1 (computer, printers) and VLAN 100 (phones)
To give this device access to the PBX, I had to have a connection to my LAN. I did this using the WAN port, to avoid DHCP conflicts that might arise with its built-in DHCP server if I connected my LAN to its LAN port. This allowed me to connect it to my network.
I was able to get the device to act as a SIP client to my Raspberry Pi PBX, so that I could use its analog FXS phone port plus my analog telephone to register with RasPBX as an extension and make/receive calls (though the UC 320W, annoyingly, required setting a key to use to dial “out” to the SIP trunk, so my dialling actions were not identical when using the analog phone and the SIP phone). However, this was the opposite of what I wanted to accomplish, as I wanted the Raspberry Pi to be using the UC 320W as a SIP trunk, not the other way around.
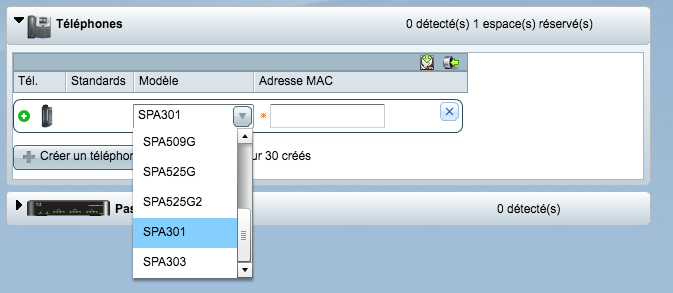
After confirming that the UC 320W manual had no instructions on how to configure the FXO adapter as a SIP gateway, I poked around in the menus for a while. My initial thought was to create a SIP extension in the UC 320W, and then register the Raspberry Pi as a client that would be able to dial out and to which incoming calls would be sent. However, the UC 320W refused to create an extension without specifying a Cisco phone configuration, and even specifying a phone type did not allow any configuration (such as SIP authentication information) except for the telephone’s MAC address.
So, at this point it seemed impossible to use this device to do what I wanted: no way to make it send calls to my PBX by registering it as a client, not to allow my PBX to make outgoing calls.
Actually, after some Googling, that second part isn’t quite true. It turns out that there are quite a few reports of people having their UC 320W devices used by attackers trying to place calls (link 1, link 2) due to a security flaw where the device would allow incoming SIP connections on the WAN port on UDP port 5064. That sounded like a horrible thing for a business with a bad firewall, but exactly the kind of security weakness I needed to be able to do what I wanted! I quickly set up the Cisco’s WAN port IP address as a trunk in Asterisk, on port 5064, with no authentication, and tried to dial out.
It worked – once, kind of. The call didn’t complete, but I did see the “LINE 1” indicator on the UC 320W show that dialling activity was happening. Then, on subsequent attempts, it stopped working. Restarting the device made no difference. I was about to pull out Wireshark and start running packet traces, when I noticed something funny in the configuration menu of the UC 320W:

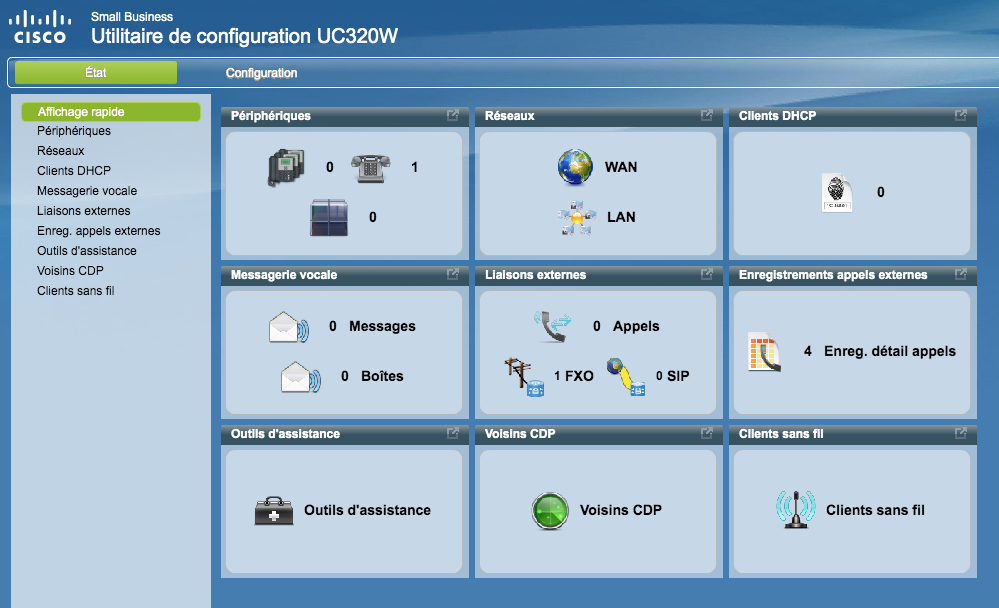
In the “Liaisons externes” page, there was a single entry, indicating a SIP URL for the FXO port, the very one that I was trying to reach, as well as a UDP port. I tried connecting to this using a softphone on my LAN using the UC 320W’s WAN interface address, with no luck. But what about connecting from a device within VLAN 100?
I set my computer to accept tagged packets from VLAN 100, plugged the computer directly into one of the UC 320W’s LAN ports, and two things happened:
– my computer, despite not being a Cisco phone, received an IP address via DHCP, and was even able to access the internet.
– I was able to place an outbound call using a softphone by dialling phonenumber@192.168.xx.xx:5081. Even with no sort of authentication, any phone number I sent to it would graciously be dialled using the FXO port, which was connected to the phone port on the box provided by my phone/Internet provider.
So, with the knowledge that the device would allow unauthenticated SIP calls to use the FXO1 port (on the VoIP VLAN, at least), I just had to connect the PBX. A Raspberry Pi 4 only has one Ethernet port, but my PBX needed access to two networks: my LAN, and the VLAN 100 of the UC 320W. Fortunately, with a managed switch, it was possible to set things up:
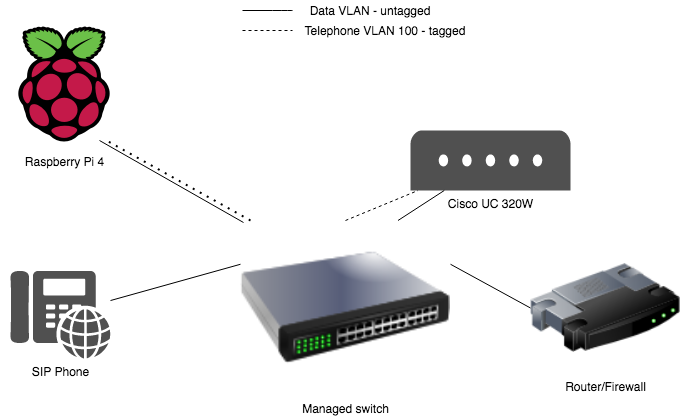
The Raspberry Pi connects to the switch using a single cable. The switch port sends it untagged packets for the data VLAN, as well as tagged packets for the voice VLAN 100. The VLAN 100 packets are connected to a unique virtual interface within the Raspberry Pi, which effectively shows two network connections, with addresses obtained by DHCP on both (from the router/firewall for the main network, and from the UC 320W on VLAN 100).
The Cisco’s WAN port connects to an untagged network access port on the managed switch (this is only really used for management and NTP synchronisation, and doesn’t do much else), and its LAN port (which natively sends out tagged packets for the voice VLAN on VLAN 100) is connected to a port on the switch to which VLAN 100 is assigned. So, the switch essentially serves as a bridge between the Raspberry Pi and the UC 320 W while allowing the Pi to have connectivity to both the main data network and the voice VLAN as well.
Once this was set up, I added a new CHAN_PJSIP trunk in the PBX, indicating the IP address of the UC 320W on the voice VLAN 100, UDP port 5081 as was indicated in the UC 320W’s web interface, and the username FXO1:
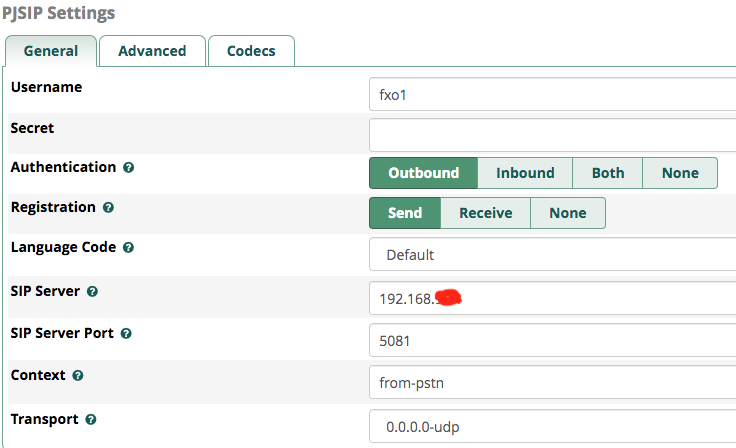
I left authentication at “Outbound”, and set Registration to “Send” in the vain hope that this might cause calls coming in to the UC 320W from the analog phone port to be sent to the PBX.
After adding an outbound route using this new trunk, I was able to call out from my internet provider’s analog telephone port using the UC 320W’s FXO1 port. Hooray!!!
At this point, though, I wasn’t quite ready to call the project a success, as I still couldn’t receive calls in the PBX. The GUI for the UC 320W requires you to choose a destination for incoming calls, and the only destinations available seemed to be registered Cisco telephones (of which I had none), or voicemail. However, I did notice that there was an option to use “external” as a destination:
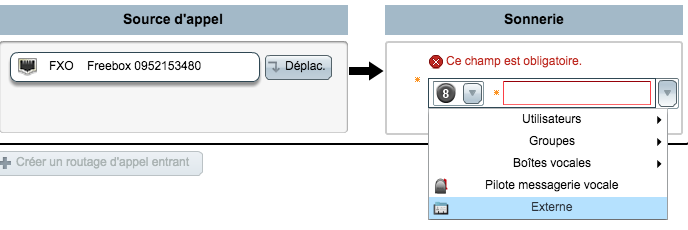
This option allowed me to re-route the incoming call to an external phone number. Normally, this might seem like the exact opposite of what would be necessary except… that I can configure the UC 320W as a client of the Raspberry Pi PBX, and have it “dial” an internal extension to forward incoming FXO calls to my PBX! So, I would need to:
– create a SIP extension in the PBX to which the UC 320W will connect as though it were a SIP trunk, and then configure this in the UC 320W
– create a virtual extension in the PBX that the UC 320W will call. I am making a virtual extension because I want calls to go to my IVR, but the Cisco unit needs a number to call, so all calls going to this virtual extension will be forwarded to the IVR.
With this set up, I tried dialling into the PBX from the UC 320W using just a telephone connected to the FXS telephone jack and sending calls to my virtual extension that was being used to route calls through the IVR. For some reason, the UC 320W wouldn’t even let me dial the number, which had been in the 2000 range. I changed it to a number in the 1000 range, both in the Cisco system and in the Raspberry Pi, and for some reason the UC 320W was happy to connect the call, sending me to my IVR. I then tested this with incoming calls via the FXO port, and it worked perfectly!
So, so summarise, my system now worked as follows:
Outgoing calls: Raspberry Pi, a client on VLAN 100, is given an IP address by the UC 320’s server. It makes calls using the SIP URL phonenumber@CiscoVLAN100IPAddress:5081.
Incoming calls: Cisco UC 320W, a client on the main data VLAN via its WAN port, has a SIP trunk set up, which is really just an extension on the Raspberry Pi PBX. Phone calls coming into the UC 32oW are forwarded to the phone number “1000” via this SIP trunk. The PBX has a virtual extension set up on extension 1000 that immediately forwards any callers to the French-language IVR, the same as if they had called the French SIP number.
So, in the end, through a bunch of ridiculous hoops, the system is effectively acting as an FXO adapter. The only two downsides are:
– The audio is a bit distorted. This may be a gain issue, so I will try adjusting the gain on the UC 320W’s analog interface.
– There is no Caller ID passthrough when the UC 320W forwards a call into the PBX. The origin number is displayed as the extension I assigned to the UC 320W SIP trunk. However, this isn’t a really big deal, as I can consult the GUI of the ISP’s box to view the call history and find the originating number.
It’s getting late… Time to wrap things up! For anyone out there with a Cisco UC 320W, I hope that this has been a helpful read. For anyone else, I hope you enjoyed this bizarre, sleep-deprived dive into making things take part in workflows for which they were not designed!